Cables
Cash Drawer Cables FAQs
Learn more about your cash drawer cable connection needs. APG offers cables to connect to a POS printer, USB port, peripheral interface and more. Scroll below to review our cable FAQs. If you need additional technical support help, please fill out the form at the bottom of this page or contact us on our Support page.

Operating + Maintenance
Click here to view frequently asked questions related to cash drawer maintenance and operational resources
What cable do I need? I have no cable.
The MutliPRO® 320/420/520 cash drawer cable part number is dependent on the printer/terminal it connects to. Reference our Connectivity Guide for the correct cable to purchase. Cables can be purchased from POS reseller’s or from our online store. Please note the following cable updates: – CD-005A and CD-014A cables have been replaced by the CD-101A cable – CD-005B, and CD-014B cables have been replaced by the CD-101B cable – CD-001A cable has been replaced by the CD-102A cable – CD-001B cable has been replaced by the CD-102B cable – CD-005A10 and CD-014A10 cables have been replaced by the CD-101A-10 cable

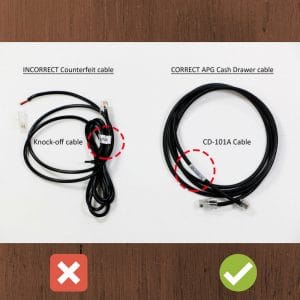
An apg cable uses a robust heavier gauge wire, with our name on a white label. The counterfeit cable uses a thinner gauge wire which is easily broken, with a long silver label or no label at all. Please make the right purchasing decisions to prevent later complications and malfunctions. apg Cables can be purchased on our online store.
What cables are required for my cash drawer?
Depending on which cash drawer you purchased and how you want to set up your POS system will determine what cabling is required. You may require a cable splitter, daisy chain, multiple cables for multiple drawer configurations. Please refer to our POS Connectivity Guide to learn more about what kind of cable you need to set up your cash drawer.
Why is there no cable included with my MultiPRO® 320/cash drawer?
MultiPRO® cables are sold separately. The correct cable depends upon your receipt printer make and model. We have various ready-made cables. View the Connectivity Guide and how to connect a cash drawer to a printer.
How to Connect a Cash Drawer to a POS Receipt Printer
Want to learn how to connect a cash drawer to a POS receipt printer? Review the instructions and watch the video below for help! You have purchased the 24 volt dc printer driven cash drawer. This video will help you with cable procurement and troubleshooting tips regarding the cash drawer’s electronic opening from your POS receipt printer. The correct APG cable part number required is contingent on your receipt printer make and model. Your precise APG cable part number is located on our connectivity guide. Your cable part number is located on the third column. For example, if you have the Epson TM series receipt printer you require the CD-101A cable. This cable is available through POS resellers and easily found online. In your browser search CD-101A to view your purchasing options. Clip the smaller end of the cable to the drawer kick port of your printer. Then, verify the larger end of the cable is installed in the cash drawer’s RJ 45 port on the bottom of the drawer. Now that the connection is complete there are a few requirements that must be met. Let’s make sure your cash drawer is mechanically sound. Use the key to open then close the drawer nice and smooth with the latch click closing. Verify the lock is in the vertical, 12 to 6 o’clock – electrically online position. Your receipt printer must be operational and error-free or it will not electronically kick open the drawer. Finally, your point of sale software must communicate to the printer there is a cash drawer, so make sure your cash drawer is enabled in your point of sale software. This might require assistance from your POS software provider. More information can be found here.
Contact Us for Cash Drawer Technical Support


